Your First DMN Model: Vacation Days Calculation
This tutorial will guide you through creating a complete DMN model for calculating employee vacation days. We'll start from scratch and build a decision model that considers an employee's age and years of service to determine their vacation entitlement.
Understanding the Business Requirements
Before modeling, let's understand what we're trying to achieve. Our vacation days calculation follows these business rules:
- All employees receive a base allocation of 22 vacation days for their Base Vacation Days
-
Three additional day categories exist:
-
- Employees younger than 18 or older than 60 get 5 extra days
- Employees with more than 30 years of service get 7 extra days
- Extra Days Case 2:
- Employees older than 60 get 3 extra days
- Employees with more than 30 years of service get 4 extra days
- Extra Days Case 3:
- Employees with 15-30 years of service get 3 extra days
- Employees aged 45 or older get 2 extra days
- Total vacation days are calculated as:
- Base days + maximum of (Case 1, Case 3) + Case 2
Setting Up Aletyx Playground
-
Navigate to Aletyx Playground in your browser
-
From the landing page, click New Decision to create a new DMN model
-
You'll be presented with an empty DMN model editor. This is where we'll design our decision model
-
First, change the name of the model from "Untitled" to "vacation-days"
Creating Input Nodes
Our decision model relies on two inputs: the employee's age and their years of service.
-
Drag an Input Data node (oval shape) from the left palette onto the model editor
-
Double-click the node and rename it to "Age"
-
With the node selected, open the properties panel by clicking the "i" icon in the top right or pressing the "i" key
-
Change the Data Type to "number"
-
Repeat steps 1-4 to create another Input Data node named "Years of Service" with the data type "number"

Creating the Base Vacation Days Decision
First, let's define the base vacation entitlement that all employees receive:
-
Drag a Decision node (rectangle shape) onto the model editor
-
Name the node "Base Vacation Days"
-
Set its Data Type to "number"
-
Click on the node and select Edit to define the decision logic
-
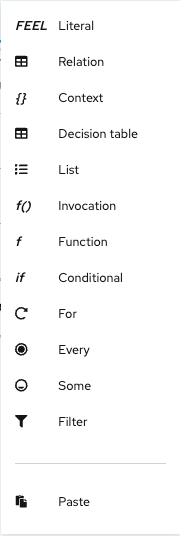
In the expression editor, select Literal expression as the expression type. For reference on the different expressions see the below image with annotations or refer to the Select Expression Reference
 Literal ExpressionThe simplest expression type. Used for direct values, mathematical operations, or simple FEEL expressions. Example:
Base Premium * Risk FactorRelationCreates a table structure for organizing data. Unlike a decision table, relations don't contain logic but represent structured data with columns and rows. See: RelationReference.ContextDefines a set of key-value pairs (named variables) that can be referenced within the context. Useful for multi-step calculations that build on previous values. See: Context Reference.Decision TableThe most widely used DMN expression. Organizes conditions (inputs) and conclusions (outputs) in a tabular format with hit policies determining how rules are applied. See: Decision Table Reference.ListCreates an ordered collection of values or expressions. Each list item can be a different type of expression, allowing for complex collections. See: List Reference.InvocationCalls a Business Knowledge Model (BKM) or function defined elsewhere in the model. Parameters can be passed to the function being called. See: Invocation Reference.FunctionDefines a reusable function with parameters. Can contain any FEEL expression type and be used within other expressions through Invocation. See: Function Reference.Conditional (If/Then/Else)Creates branching logic with if, then, else statements. Allows for different results based on specific conditions being met. See: Conditional Reference.For LoopIterates over items in a list or collection, applying an expression to each item. Useful for transforming collections or aggregating values. See: For Loop Reference.SomeTests when a condition is true for at least one item See: Some reference.FilterFilters a collection based on a given condition. See: Filter Reference.EveryTests if a condition is true for every item in a collection. Returns a boolean result based on whether all items satisfy the condition. See: Every Reference -
Enter the value "22" in the expression editor
-
Click Back to Diagram to return to the main model editor

Creating Extra Days Case Decisions
Now we'll create the three decision nodes for calculating additional vacation days:
Extra Days Case 1
-
Add a Decision node named "Extra days case-1" with data type "number"
-
Connect both input nodes ("Age" and "Years of Service") to this decision node using the information requirement arrows
-
Edit the decision node and select Decision Table as the expression type
-
Create the following decision table:
| Age | Years of Service | Extra days case-1 | Annotation |
|---|---|---|---|
| <18, >=60 | - | 5 | Less than 18 or older than 60 |
| - | >30 | 7 | More than 30 years of service |
- Change the hit policy from "U" (Unique) to "Collect Max" by:
- Clicking the "U" in the upper-left corner
- Selecting "Collect"
-
Choosing "MAX" as the aggregator function
-
Set a default value of "0" for the output column:
- Select the output column header
- Open the properties panel
-
Find the "Default value" field and enter "0"
-
Click Back to Diagram to return to the model editor

Extra Days Case 2
-
Add another Decision node named "Extra days case-2" with data type "number"
-
Connect both input nodes to this decision node
-
Create a decision table with the following rules:
| Age | Years of Service | Extra days case-2 | Annotation |
|---|---|---|---|
| >=60 | - | 3 | Older than 60 |
| - | >30 | 4 | More than 30 years of service |
-
Set the hit policy to "Collect Max" as before
-
Add a default value of "0" for the output column
Extra Days Case 3
-
Add a third Decision node named "Extra days case-3" with data type "number"
-
Connect both input nodes to this decision node
-
Create a decision table with the following rules:
| Age | Years of Service | Extra days case-3 | Annotation |
|---|---|---|---|
| - | [15..30] | 3 | Between 15-30 years of service |
| >=45 | - | 2 | Older than 45 |
-
Set the hit policy to "Collect Max"
-
Add a default value of "0" for the output column
Creating the Total Vacation Days Decision
Now we'll create a final decision node that combines all the previous decisions:
-
Add a Decision node named "Total Vacation Days" with data type "number"
-
Connect all four previous decision nodes to this node using information requirement arrows
-
Edit the node and select Literal expression as the expression type
-
Enter the following FEEL expression:
- Click Back to Diagram to return to the model editor

Testing Your DMN Model
Aletyx Playground includes a testing feature that allows you to validate your model with sample inputs:
-
Click the Run button in the toolbar
-
In the testing panel, enter values for "Age" and "Years of Service"
-
Click Run Test to see the results for all decision nodes
Try these test cases to validate your model:
| Age | Years of Service | Expected Total Vacation Days |
|---|---|---|
| 16 | 1 | 27 (22 base + 5 case 1 + 0 case 2) |
| 25 | 5 | 22 (22 base + 0 from all cases) |
| 44 | 20 | 25 (22 base + 3 case 3 + 0 case 2) |
| 44 | 30 | 29 (22 base + 3 case 3 + 4 case 2) |
| 62 | 20 | 30 (22 base + 5 case 1 + 3 case 2) |
Understanding the Model Behavior
Let's examine what happens in our model:
-
Independence of Base Decision: The "Base Vacation Days" decision has no dependencies, so it's always 22
-
Case-by-Case Evaluation: Each "Extra days" decision evaluates independently based on the input values
-
Collection with Maximum: The "Collect Max" hit policy ensures we take the highest value when multiple rules match
-
Default Values: The default value of "0" ensures we have a definite value when no rules match
-
Final Aggregation: The "Total Vacation Days" decision combines all results according to our formula
Saving and Sharing Your Model
In Aletyx Playground, your work is automatically saved in browser storage. To ensure you don't lose your work:
-
Use the Download option to save your DMN file locally, or
-
Connect to a Git repository by clicking the Share button (we'll cover this in more detail in the Accelerators guide)
What's Next?
Congratulations! You've created your first DMN model. In this tutorial, you've learned:
- How to create input nodes and decision nodes
- How to define decision logic using literal expressions and decision tables
- How to connect decisions with information requirements
- How to test your decision model with sample inputs
In the next guide, Working with DMN Accelerators, you'll learn how to turn your model into a fully functional decision service using accelerators.
Ready to take your DMN model to the next level? Continue to the next guide!